UE4基础:一键出包脚本
UE4 提供了一个非常好用的脚本 BuildGraph ,使用 xml 语法,用来配置控制 UnrealBuildTool,AutomationTool 来自定义出包流程,具体用法见官方文档
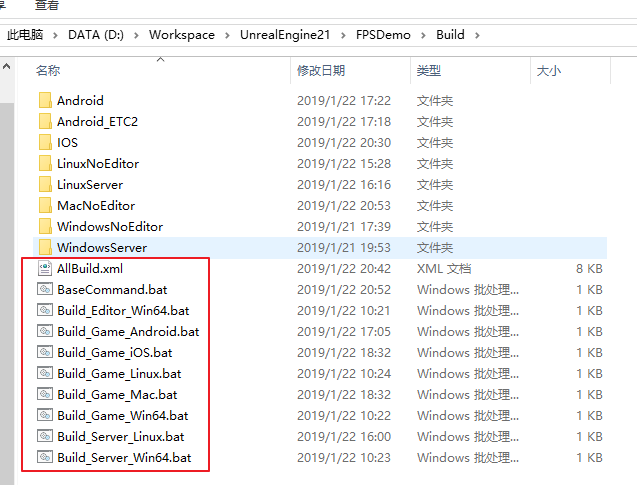
本文的目的就是使用 BuildGraph,在工作 PC 机上可以出各个平台的包和 DedicatedServer,如有需要可自己在这个基础上进行扩展(BaseCommand.bat 里有几个路径需要根据自己的项目进行修改),一般出包相关的脚本都统一放到工程目录的 Build 文件夹下方便提交到库里进行版本控制,如图

AutomationScript
在 Build 目录下新建一个文件 AllBuild.xml,内容如下
<?xml version='1.0' ?>
<BuildGraph xmlns="http://www.epicgames.com/BuildGraph" xmlns:xsi="http://www.w3.org/2001/XMLSchema-instance" xsi:schemaLocation="http://www.epicgames.com/BuildGraph ../../Engine/Build/Graph/Schema.xsd">

    <!-- Option Begins -->
    <Option Name="BuildEditor" DefaultValue="true" Description="Build editor or not. Default is build."/>
    <Option Name="BuildTools" DefaultValue="false" Description="Build tools or not. Default is not build."/>
    <Option Name="BuildConfiguration" DefaultValue="Development" Description="Debug, Development or Shipping."/>
    <Option Name="WithClean" DefaultValue="false" Description="Clean before build."/>
    <Option Name="WithDebugInfo" DefaultValue="false" Description="Enable debug info in Development and Shipping."/>
    <Option Name="WithCook" DefaultValue="true" Description="Cook asset."/>
    <Option Name="IgnoreCookErrors" DefaultValue="false" Description=""/>
    <Option Name="IterativeCooking" DefaultValue="false" Description=""/>
    <Option Name="ProjectDir" DefaultValue="" Description=""/>
    <Option Name="ProjectName" DefaultValue="" Description=""/>
    <!-- Option Ends -->

    <!-- Command Begins -->
    <Property Name="CleanCommand" Value="" />
    <Property Name="CleanCommand" Value="-Clean" If="$(WithClean)"/>

    <Property Name="BuildCommand" Value="-Build -NoCompileEditor -SkipBuildEditor"/>
    <Property Name="BuildCommand" Value="$(BuildCommand) -ForceDebugInfo" If="$(WithDebugInfo)"/>

    <Property Name="PakCommand" Value="-Pak"/>

    <Property Name="CookCommand" Value="-Cook -SkipCookingEditorContent -UnversionedCookedContent -CookPartialgc -Compressed"/>
    <Property Name="CookCommand" Value="$(CookCommand) -IgnoreCookErrors" If="$(IgnoreCookErrors)"/>
    <Property Name="CookCommand" Value="$(CookCommand) -IterativeCooking" If="$(IterativeCooking)"/>
    <Property Name="CookCommand" Value="-SkipCook" If="'$(WithCook)' == false"/>

    <Property Name="StageCommand" Value="-Stage"/>

    <Property Name="PackageCommand" Value="-Package"/>

    <Property Name="ArchiveCommand" Value="-Archive -ArchiveDirectory=$(ProjectDir)\Binaries"/>

    <Property Name="BaseCommand" Value="-project=$(ProjectDir)\$(ProjectName).uproject -UTF8Output -NoP4 -Prereqs $(CleanCommand) $(BuildCommand) $(PakCommand) $(CookCommand) $(StageCommand) $(ArchiveCommand)"/>
    <Property Name="BaseGameCommand" Value="$(BaseCommand) -ClientConfig=$(BuildConfiguration) $(PackageCommand)"/>
    <Property Name="BaseServerCommand" Value="$(BaseCommand) -DedicatedServer"/>

    <!-- Command Ends -->

    <Agent Name="Tools Win64" Type="BuildOnWindows">
        <Node Name="Build Tools Win64" If="$(BuildTools)">
            <Compile Target="ShaderCompileWorker" Configuration="Development" Platform="Win64" Tag="#Build Tools Win64"/>
            <Compile Target="UnrealPak" Configuration="Development" Platform="Win64" Tag="#Build Tools Win64"/>
        </Node>
    </Agent>

    <Agent Name="Editor Win64" Type="BuildOnWindows">
        <Node Name="Build UnrealHeaderTool Win64">
            <Compile Target="UnrealHeaderTool" Platform="Win64" Configuration="Development"/>
        </Node>
        <Node Name="Build Editor Win64" Requires="Build UnrealHeaderTool Win64" If="$(BuildEditor)">
            <Compile Target="$(ProjectName)Editor" Platform="Win64" Configuration="Development" Arguments="$(ProjectDir)\$(ProjectName).uproject" Tag="#Build Editor Win64"/>
        </Node>
    </Agent>

    <!-- Games Begins -->

    <Agent Name="Game Win64" Type="BuildOnWindows">
        <Node Name="Build Game Win64">
            <Property Name="Win64GameCommand" Value="-TargetPlatform=Win64 $(BaseGameCommand)"/>
            <Log Message="BuildCookRun with arguments: $(Win64GameCommand)"/>
            <Command Name="BuildCookRun" Arguments="$(Win64GameCommand)"/>
        </Node>
    </Agent>

    <Agent Name="Game Linux" Type="BuildOnWindows">
        <Node Name="Build Game Linux">
            <Property Name="LinuxGameCommand" Value="-TargetPlatform=Linux $(BaseGameCommand)"/>
            <Log Message="BuildCookRun with arguments: $(LinuxGameCommand)"/>
            <Command Name="BuildCookRun" Arguments="$(LinuxGameCommand)"/>
        </Node>
    </Agent>

    <Agent Name="Game Mac" Type="BuildOnWindows">
        <Node Name="Build Game Mac">
            <Property Name="MacGameCommand" Value="-TargetPlatform=Mac $(BaseGameCommand)"/>
            <Log Message="BuildCookRun with arguments: $(MacGameCommand)"/>
            <Command Name="BuildCookRun" Arguments="$(MacGameCommand)"/>
        </Node>
    </Agent>

    <Agent Name="Game Android" Type="BuildOnWindows">
        <Node Name="Build Game Android">
            <Property Name="AndroidGameCommand" Value="-TargetPlatform=Android -CookFlavor=ETC2 $(BaseGameCommand)"/>
            <Log Message="BuildCookRun with arguments: $(AndroidGameCommand)"/>
            <Command Name="BuildCookRun" Arguments="$(AndroidGameCommand)"/>
        </Node>
    </Agent>

    <Agent Name="Game iOS" Type="BuildOnWindows">
        <Node Name="Build Game iOS">
            <Property Name="iOSGameCommand" Value="-TargetPlatform=IOS $(BaseGameCommand)"/>
            <Log Message="BuildCookRun with arguments: $(iOSGameCommand)"/>
            <Command Name="BuildCookRun" Arguments="$(iOSGameCommand)"/>
        </Node>
    </Agent>

    <!-- Games Ends -->

    <!-- Servers Begins -->

    <Agent Name="Server Win64" Type="BuildOnWindows">
        <Node Name="Build Server Win64">
            <Property Name="Win64ServerCommand" Value="-ServerTargetPlatform=Win64 $(BaseServerCommand)"/>
            <Log Message="BuildCookRun with arguments: $(Win64ServerCommand)"/>
            <Command Name="BuildCookRun" Arguments="$(Win64ServerCommand)"/>
        </Node>
    </Agent>

    <Agent Name="Server Linux" Type="BuildOnWindows">
        <Node Name="Build Server Linux">
            <Property Name="LinuxServerCommand" Value="-ServerTargetPlatform=Linux $(BaseServerCommand)"/>
            <Log Message="BuildCookRun with arguments: $(LinuxServerCommand)"/>
            <Command Name="BuildCookRun" Arguments="$(LinuxServerCommand)"/>
        </Node>
    </Agent>

    <!-- Servers Ends -->
</BuildGraph>
再新建一个 BaseCommand.bat 用来调用 AutomationScript,内容如下
@echo off

set CurrentPath=%~dp0

rem 以下参数根据自己实际路径进行修改

set ProjectName=FPSDemo
set ProjectDir=%CurrentPath%..
set UATPath="%CurrentPath%..\..\Engine\Build\BatchFiles\RunUAT.bat"
set AutomationScriptPath="%CurrentPath%AllBuild.xml"

rem ends

if %Target%=="" set Target="Build Editor Win64"
if "%IterativeCooking%"=="" set IterativeCooking=true
if "%BuildConfiguration%"=="" set BuildConfiguration=Development
if "%WithClean%"=="" set WithClean=false

call %UATPath% BuildGraph -Script=%AutomationScriptPath% -Target=%Target% -set:ProjectDir=%ProjectDir% -set:ProjectName=%ProjectName% -set:IterativeCooking=%IterativeCooking% -set:BuildConfiguration=%BuildConfiguration% -set:WithClean=%WithClean%

pause
Windows 相关的包
编辑器
在 Build 目需下新建 Build_Editor_Win64.bat,双击运行编译编辑器相关dll,内容如下
@echo off

set Target="Build Editor Win64"
set IterativeCooking=true
set BuildConfiguration=Development
set WithClean=false

call BaseCommand.bat
出包结果如图

Game
在 Build 目需下新建 Build_Game_Win64.bat,双击运行打包 Win64 客户端,内容如下
@echo off

set Target="Build Game Win64"
set IterativeCooking=true
set BuildConfiguration=Development
set WithClean=false

call BaseCommand.bat
出包结果如图

Dedicated Server
在 Build 目需下新建 Build_Server_Win64.bat,双击运行打包 Win64 服务端,内容如下
@echo off

set Target="Build Server Win64"
set IterativeCooking=true
set BuildConfiguration=Development
set WithClean=false

call BaseCommand.bat
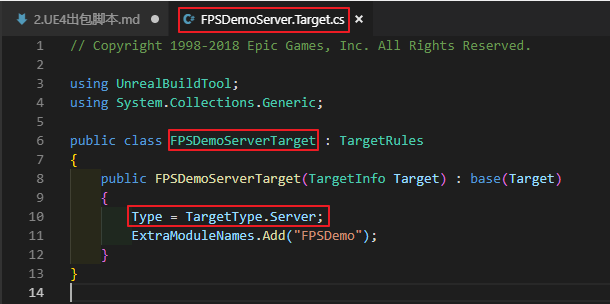
注意,出 DS 包之前确保 Source 目录下有 Server Target 的定义文件,如图

出包结果如图

Linux 相关的包
想要在 Windows 出 Linux 平台的包,需要先安装交叉编译环境,并且执行引擎 Setup.bat 时,需要额外的命令行参数 -include=Linux 下载 Linux 平台的依赖库
交叉编译环境
安装文档见官网 Cross-Compiling for Linux
安装好后最好重启下电脑
Game
在 Build 目需下新建 Build_Game_Linux.bat,双击运行打包 Linux 客户端,内容如下
@echo off

set Target="Build Game Linux"
set IterativeCooking=true
set BuildConfiguration=Development
set WithClean=false

call BaseCommand.bat
出包结果如图

Dedicated Server
在 Build 目需下新建 Build_Server_Linux.bat,双击运行打包 Linux 服务端,内容如下
@echo off

set Target="Build Server Linux"
set IterativeCooking=true
set BuildConfiguration=Development
set WithClean=false

call BaseCommand.bat
出包结果如图

Android 包
执行引擎 Setup.bat 时,需要额外的命令行参数 -include=Android 下载 Android 平台的依赖库
安装 Android 编译环境
打开 [Path To Your UE4 Root]\Engine\Extras\AndroidWorks\Win64 路径,运行 CodeWorksforAndroid.exe,使用默认选项即可,下载安装 Android sdk, ndk, java jdk,如图

编辑器 Android 配置
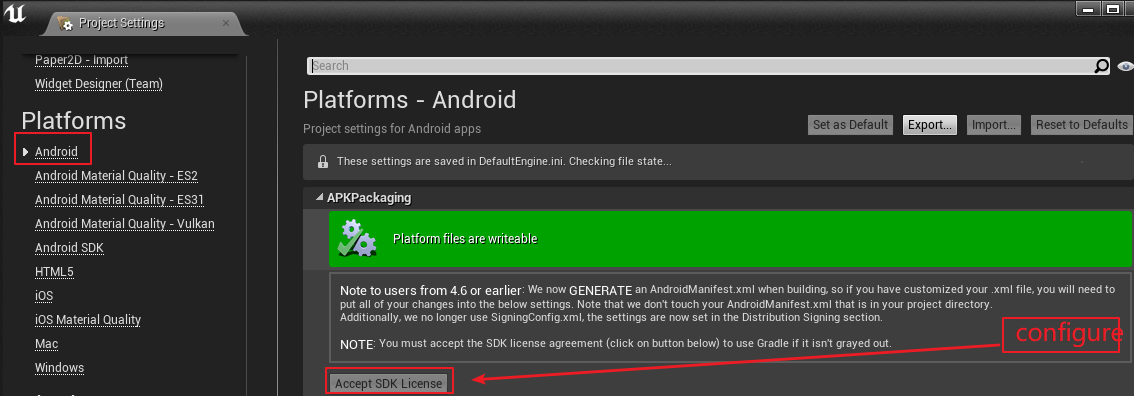
打开项目编辑器,打开项目配置,选择 Android 菜单,点击配置按钮,然后再点击接受按钮完成配置,如图

正确安装好 Android 编译环境后,编辑器会根据系统环境变量识别各个 SDK 的路径,如图

Game
在 Build 目需下新建 Build_Game_Android.bat,双击运行打包 Android 客户端,内容如下
@echo off

set Target="Build Game Android"
set IterativeCooking=true
set BuildConfiguration=Development
set WithClean=false

call BaseCommand.bat
出包结果如图

Mac/iOS 相关的包
要在 Windows 上出 Mac 和 iOS 包,需要走远程编译流程,首先要有一台 Mac,在 Windows 上通过 ssh 连接到 Mac 上,将代码文件上传到 Mac 上进行编译,最后将编译完成后的程序下载回来,然后在本机进行资源 Cook,最终打包到一起
同样,执行引擎 Setup.bat 时,需要额外的命令行参数 -include=Mac -include=IOS 下载 Mac/IOS 平台的依赖库
Mac 设置
- 打开远程登录: 系统偏好设置 -> 共享 -> 勾选远程登录,在右边可以看到相应的用户名和ip信息
- 节能设置: 系统偏好设置 -> 节能 -> 勾选 当显示器关闭时,防止电脑自动进入睡眠。不然的话显示器关闭时,ssh就可能连不上了
- 检查xcode版本: 引擎版本和 xcode 版本有一定的对应关系,比如 4.18 要用 xcode 9.2 及之前的版本编译,一般最新引擎版本用最新的 xcode 去编总是没错
- 修改ssh设置: 这一步不是必须的,在 /etc/ssh 目录下有个 sshd_config 的配置文件,里面有几项配置可以看着改下(比如公用的 Mac 就可以将连接数增大一点),如果修改需要将前面的注释符 # 号去掉
- ClientAliveInternal 客户端超时时间,单位秒
- ClientAliveCountMax 客户端超时次数,当一个连接连续超时对应次数时,就断开
- MaxStartups x:y:z 从第x个连接开始,以y的概率拒绝连接,直到z个为止
- 安装苹果开发者证书
PC 设置
-
打开项目编辑器,在项目设置中 Platforms -> iOS 菜单下,导入描述文件和 p12 证书,Status 里显示 Valid 就说明证书匹配,如图


-
下拉滚动条,在 Build 菜单中设置远程 Mac 主机信息(ip地址端口,登录用户名),然后点击 Generate SSH Key 按钮,如图

-
在跳出来的命令行窗口中,先按任意键继续,第一次会出现如下提示,输入 yes

-
再输入 Mac 电脑的登录密码(密码是不会回显的),如图

-
然后会提示 Enter passphrase,直接回车,如图

-
之后会出现如图提示,再按任意键继续

-
再次输入 Mac 的登录密码

-
最后如图没有看到错误提示的话,就是成功了,如图,按任意键结束

-
在 C:\Users[YourUserName]\AppData\Roaming\Unreal Engine\UnrealBuildTool\SSHKeys[MacIp][MacUserName] 目录下就会看到生成的密钥了
Mac Game
在 Build 目需下新建 Build_Game_Mac.bat,双击运行打包 Mac 客户端,内容如下
@echo off

set Target="Build Game Mac"
set IterativeCooking=true
set BuildConfiguration=Development
set WithClean=false

call BaseCommand.bat
出包结果如图

iOS Game
目前用 BuildGraph 远程出 iOS 包有一个 BUG,见 UE-64059
,这个 BUG 官方会在 4.22 中修复,4.22 版本之前可以自己手动修改,打开 Engine\Source\Programs\AutomationTool\IOS\IOSPlatform.Automation.cs,在 PreBuildAgenda 函数中,将 Agenda.DotNetProjects.Add(@"Engine\Source\Programs\IOS\iPhonePackager\iPhonePackager.csproj"); 这行代码注释掉
在 Build 目需下新建 Build_Game_iOS.bat,双击运行打包 iOS 客户端,内容如下
@echo off

set Target="Build Game iOS"
set IterativeCooking=true
set BuildConfiguration=Development
set WithClean=false

call BaseCommand.bat
出包结果如图


